
Bomb Defusal Manual
www.keeptalkinggame.com
Version 1
Verification Code: 241
Expanded mod version (Road To Centurion section 04)

Expanded mod version (Road To Centurion section 04)
Welcome to the dangerous and challenging world of bomb defusing.
Study this manual carefully; you are the expert. In these pages you will find everything you need to know to defuse even the most insidious of bombs.
And remember — One small oversight and it could all be over!
A bomb will explode when its countdown timer reaches 0:00 or when too many strikes have been recorded. The only way to defuse a bomb is to disarm all of its modules before its countdown timer expires.
Front |
Side |
Each bomb will include a certain number of modules that must be disarmed. With a few exceptions, each module is discrete and can be disarmed in any order.
Instructions for disarming modules can be found in Section 1. "Needy" modules present a special case and are described in Section 2.
When the Defuser makes a mistake, the bomb will record a strike which will be displayed on the indicator above the countdown timer. Bombs with a strike indicator will typically explode upon the third strike. The timer will begin to count down faster after a strike has been recorded.
If no strike indicator is present above the countdown timer, the bomb will explode upon the first strike, leaving no room for error.
Some disarming instructions will require specific information about the bomb, such as the serial number. This type of information can typically be found on the top, bottom, or sides of the bomb casing. See the appendices, most notably A, B and C, for instructions that will be useful in disarming certain modules.
Modules can be identified by an LED in the top right corner. When this LED is lit green, the module has been disarmed.
All modules must be disarmed to defuse the bomb.
Wires are the lifeblood of electronics! Wait, no, electricity is the lifeblood. Wires are more like the arteries. The veins? No matter…
| 3 wires:
If there are no red wires, cut the second wire. Otherwise, if the last wire is white, cut the last wire. Otherwise, if there is more than one blue wire, cut the last blue wire. Otherwise, cut the last wire. |
| 4 wires:
If there is more than one red wire and the last digit of the serial number is odd, cut the last red wire. Otherwise, if the last wire is yellow and there are no red wires, cut the first wire. Otherwise, if there is exactly one blue wire, cut the first wire. Otherwise, if there is more than one yellow wire, cut the last wire. Otherwise, cut the second wire. |
| 5 wires:
If the last wire is black and the last digit of the serial number is odd, cut the fourth wire. Otherwise, if there is exactly one red wire and there is more than one yellow wire, cut the first wire. Otherwise, if there are no black wires, cut the second wire. Otherwise, cut the first wire. |
| 6 wires:
If there are no yellow wires and the last digit of the serial number is odd, cut the third wire. Otherwise, if there is exactly one yellow wire and there is more than one white wire, cut the fourth wire. Otherwise, if there are no red wires, cut the last wire. Otherwise, cut the fourth wire. |
You might think that a button telling you to press it is pretty straightforward. That’s the kind of thinking that gets people exploded.
See Appendix A for indicator identification reference.
See Appendix B for battery identification reference.
Follow these rules in the order they are listed. Perform the first action that applies:
If you start holding the button down, a colored strip will light up on the right side of the module. Based on its color, you must release the button at a specific point in time:
I'm not sure what these symbols are, but I suspect they have something to do with occult.
 |
 |
 |
 |
 |
 |
|||||
 |
 |
 |
 |
 |
 |
|||||
 |
 |
 |
 |
 |
 |
|||||
 |
 |
 |
 |
 |
 |
|||||
 |
 |
 |
 |
 |
 |
|||||
 |
 |
 |
 |
 |
 |
|||||
 |
 |
 |
 |
 |
 |
This is like one of those toys you played with as a kid where you have to match the pattern that appears, except this one is a knockoff that was probably purchased at a dollar store.
If the serial number contains a vowel:
| Red Flash | Blue Flash | Green Flash | Yellow Flash | ||
|---|---|---|---|---|---|
| Button to press: | No Strikes | Blue | Red | Yellow | Green |
| 1 Strike | Yellow | Green | Blue | Red | |
| 2 Strikes | Green | Red | Yellow | Blue | |
If the serial number does not contain a vowel:
| Red Flash | Blue Flash | Green Flash | Yellow Flash | ||
|---|---|---|---|---|---|
| Button to press: | No Strikes | Blue | Yellow | Green | Red |
| 1 Strike | Red | Blue | Yellow | Green | |
| 2 Strikes | Yellow | Green | Blue | Red | |
This contraption is like something out of a sketch comedy routine, which might be funny if it wasn't connected to a bomb. I’ll keep this brief, as words only complicate matters.
Based on the display, read the label of a particular button and proceed to step 2:
|
|
|
|
|
|
||||||||||||||||||||||||||||||||||||||||||||||||
|
|
|
|
|
|
||||||||||||||||||||||||||||||||||||||||||||||||
|
|
|
|
|
|
||||||||||||||||||||||||||||||||||||||||||||||||
|
|
|
|
|
|
||||||||||||||||||||||||||||||||||||||||||||||||
|
|
|
|
||||||||||||||||||||||||||||||||||||||||||||||||||
Using the label from step 1, push the first button that appears in its corresponding list:
READY: |
YES, OKAY, WHAT, MIDDLE, LEFT, PRESS, RIGHT, BLANK, READY, NO, FIRST, UHHH, NOTHING, WAIT |
|---|---|
FIRST: |
LEFT, OKAY, YES, MIDDLE, NO, RIGHT, NOTHING, UHHH, WAIT, READY, BLANK, WHAT, PRESS, FIRST |
NO: |
BLANK, UHHH, WAIT, FIRST, WHAT, READY, RIGHT, YES, NOTHING, LEFT, PRESS, OKAY, NO, MIDDLE |
BLANK: |
WAIT, RIGHT, OKAY, MIDDLE, BLANK, PRESS, READY, NOTHING, NO, WHAT, LEFT, UHHH, YES, FIRST |
NOTHING: |
UHHH, RIGHT, OKAY, MIDDLE, YES, BLANK, NO, PRESS, LEFT, WHAT, WAIT, FIRST, NOTHING, READY |
YES: |
OKAY, RIGHT, UHHH, MIDDLE, FIRST, WHAT, PRESS, READY, NOTHING, YES, LEFT, BLANK, NO, WAIT |
WHAT: |
UHHH, WHAT, LEFT, NOTHING, READY, BLANK, MIDDLE, NO, OKAY, FIRST, WAIT, YES, PRESS, RIGHT |
UHHH: |
READY, NOTHING, LEFT, WHAT, OKAY, YES, RIGHT, NO, PRESS, BLANK, UHHH, MIDDLE, WAIT, FIRST |
LEFT: |
RIGHT, LEFT, FIRST, NO, MIDDLE, YES, BLANK, WHAT, UHHH, WAIT, PRESS, READY, OKAY, NOTHING |
RIGHT: |
YES, NOTHING, READY, PRESS, NO, WAIT, WHAT, RIGHT, MIDDLE, LEFT, UHHH, BLANK, OKAY, FIRST |
MIDDLE: |
BLANK, READY, OKAY, WHAT, NOTHING, PRESS, NO, WAIT, LEFT, MIDDLE, RIGHT, FIRST, UHHH, YES |
OKAY: |
MIDDLE, NO, FIRST, YES, UHHH, NOTHING, WAIT, OKAY, LEFT, READY, BLANK, PRESS, WHAT, RIGHT |
WAIT: |
UHHH, NO, BLANK, OKAY, YES, LEFT, FIRST, PRESS, WHAT, WAIT, NOTHING, READY, RIGHT, MIDDLE |
PRESS: |
RIGHT, MIDDLE, YES, READY, PRESS, OKAY, NOTHING, UHHH, BLANK, LEFT, FIRST, WHAT, NO, WAIT |
YOU: |
SURE, YOU ARE, YOUR, YOU'RE, NEXT, UH HUH, UR, HOLD, WHAT?, YOU, UH UH, LIKE, DONE, U |
YOU ARE: |
YOUR, NEXT, LIKE, UH HUH, WHAT?, DONE, UH UH, HOLD, YOU, U, YOU'RE, SURE, UR, YOU ARE |
YOUR: |
UH UH, YOU ARE, UH HUH, YOUR, NEXT, UR, SURE, U, YOU'RE, YOU, WHAT?, HOLD, LIKE, DONE |
YOU'RE: |
YOU, YOU'RE, UR, NEXT, UH UH, YOU ARE, U, YOUR, WHAT?, UH HUH, SURE, DONE, LIKE, HOLD |
UR: |
DONE, U, UR, UH HUH, WHAT?, SURE, YOUR, HOLD, YOU'RE, LIKE, NEXT, UH UH, YOU ARE, YOU |
U: |
UH HUH, SURE, NEXT, WHAT?, YOU'RE, UR, UH UH, DONE, U, YOU, LIKE, HOLD, YOU ARE, YOUR |
UH HUH: |
UH HUH, YOUR, YOU ARE, YOU, DONE, HOLD, UH UH, NEXT, SURE, LIKE, YOU'RE, UR, U, WHAT? |
UH UH: |
UR, U, YOU ARE, YOU'RE, NEXT, UH UH, DONE, YOU, UH HUH, LIKE, YOUR, SURE, HOLD, WHAT? |
WHAT?: |
YOU, HOLD, YOU'RE, YOUR, U, DONE, UH UH, LIKE, YOU ARE, UH HUH, UR, NEXT, WHAT?, SURE |
DONE: |
SURE, UH HUH, NEXT, WHAT?, YOUR, UR, YOU'RE, HOLD, LIKE, YOU, U, YOU ARE, UH UH, DONE |
NEXT: |
WHAT?, UH HUH, UH UH, YOUR, HOLD, SURE, NEXT, LIKE, DONE, YOU ARE, UR, YOU'RE, U, YOU |
HOLD: |
YOU ARE, U, DONE, UH UH, YOU, UR, SURE, WHAT?, YOU'RE, NEXT, HOLD, UH HUH, YOUR, LIKE |
SURE: |
YOU ARE, DONE, LIKE, YOU'RE, YOU, HOLD, UH HUH, UR, SURE, U, WHAT?, NEXT, YOUR, UH UH |
LIKE: |
YOU'RE, NEXT, U, UR, HOLD, DONE, UH UH, WHAT?, UH HUH, YOU, LIKE, SURE, YOU ARE, YOUR |
Memory is a fragile thing but so is everything else when a bomb goes off, so pay attention!
If the display is 1, press the button in the second position.
If the display is 2, press the button in the second position.
If the display is 3, press the button in the third position.
If the display is 4, press the button in the fourth position.
If the display is 1, press the button labeled "4".
If the display is 2, press the button in the same position as you pressed in stage 1.
If the display is 3, press the button in the first position.
If the display is 4, press the button in the same position as you pressed in stage 1.
If the display is 1, press the button with the same label you pressed in stage 2.
If the display is 2, press the button with the same label you pressed in stage 1.
If the display is 3, press the button in the third position.
If the display is 4, press the button labeled "4".
If the display is 1, press the button in the same position as you pressed in stage 1.
If the display is 2, press the button in the first position.
If the display is 3, press the button in the same position as you pressed in stage 2.
If the display is 4, press the button in the same position as you pressed in stage 2.
If the display is 1, press the button with the same label you pressed in stage 1.
If the display is 2, press the button with the same label you pressed in stage 2.
If the display is 3, press the button with the same label you pressed in stage 4.
If the display is 4, press the button with the same label you pressed in stage 3.
An antiquated form of naval communication? What next? At least it's genuine Morse Code, so pay attention and you might just learn something.
| How to Interpret |
|---|
|
1. A short flash represents a dot. 2. A long flash represents a dash. 3. There is a long gap between letters. 4. There is a very long gap before the word repeats. |
| If the word is: | Respond at frequency: |
|---|---|
| shell | 3.505 MHz |
| halls | 3.515 MHz |
| slick | 3.522 MHz |
| trick | 3.532 MHz |
| boxes | 3.535 MHz |
| leaks | 3.542 MHz |
| strobe | 3.545 MHz |
| bistro | 3.552 MHz |
| flick | 3.555 MHz |
| bombs | 3.565 MHz |
| break | 3.572 MHz |
| brick | 3.575 MHz |
| steak | 3.582 MHz |
| sting | 3.592 MHz |
| vector | 3.595 MHz |
| beats | 3.600 MHz |
These wires aren't like the others. Some have stripes! That makes them completely different. The good news is that we've found a concise set of instructions on what to do about it! Maybe too concise...
| Wire has red coloring | |
| Wire has blue coloring | |
| Has ★ symbol | |
| LED is on |
| Letter | Instruction |
|---|---|
| C | Cut the wire |
| D | Do not cut the wire |
| S | Cut the wire if the last digit of the serial number is even |
| P | Cut the wire if the bomb has a parallel port |
| B | Cut the wire if the bomb has two or more batteries |
See Appendix B for battery identification reference.
See Appendix C for port identification reference.
It's hard to say how this mechanism works. The engineering is pretty impressive, but there must have been an easier way to manage nine wires.
| Red Wire Occurrences | |
|---|---|
| Wire Occurrence | Cut if connected to: |
| First red occurrence | C |
| Second red occurrence | B |
| Third red occurrence | A |
| Fourth red occurrence | A or C |
| Fifth red occurrence | B |
| Sixth red occurrence | A or C |
| Seventh red occurrence | A, B or C |
| Eighth red occurrence | A or B |
| Ninth red occurrence | B |
| Blue Wire Occurrences | |
|---|---|
| Wire Occurrence | Cut if connected to: |
| First blue occurrence | B |
| Second blue occurrence | A or C |
| Third blue occurrence | B |
| Fourth blue occurrence | A |
| Fifth blue occurrence | B |
| Sixth blue occurrence | B or C |
| Seventh blue occurrence | C |
| Eighth blue occurrence | A or C |
| Ninth blue occurrence | A |
| Black Wire Occurrences | |
|---|---|
| Wire Occurrence | Cut if connected to: |
| First black occurrence | A, B or C |
| Second black occurrence | A or C |
| Third black occurrence | B |
| Fourth black occurrence | A or C |
| Fifth black occurrence | B |
| Sixth black occurrence | B or C |
| Seventh black occurrence | A or B |
| Eighth black occurrence | C |
| Ninth black occurrence | C |
This seems to be some kind of maze, probably stolen off of a restaurant placemat.
Fortunately this password doesn't seem to meet standard government security requirements: 22 characters, mixed case, numbers in random order without any palindromes above length 3.
| about | after | again | below | could |
| every | first | found | great | house |
| large | learn | never | other | place |
| plant | point | right | small | sound |
| spell | still | study | their | there |
| these | thing | think | three | water |
| where | which | world | would | write |
It’s easy to identify colours. Red, Blue, Green, etc. Turns out it's a bit harder when you display a word colour in a different colour though...
|
The colour of the last word in the sequence is Red:
If Green is used as the word at least three times in the sequence, press Yes on the third time Green is used as either the word or the colour of the word in the sequence.
Otherwise, if Blue is used as the colour of the word exactly once, press No when the word Magenta is shown.
Otherwise, press Yes the last time White is either the word or the colour of the word in the sequence.
|
|
The colour of the last word in the sequence is Yellow:
If the word Blue is shown in Green colour, press Yes on the first time Green is used as the colour of the word.
Otherwise, if the word White is shown in either White or Red colour, press Yes on the second time in the sequence where the colour of the word does not match the word itself.
Otherwise, count the number of times Magenta is used as either the word or the colour of the word in the sequence (the word Magenta in Magenta colour only counts as one), and press No on the colour in the total's position (e.g. a total of 4 means the fourth colour in sequence).
|
Continuation of previous table...
|
The colour of the last word in the sequence is Green:
If a word occurs consecutively with different colours, press No on the fifth entry in the sequence.
If Magenta is used as the word as least three times in the sequence, press No on the first time Yellow is used as either the word or the colour of the word in the sequence.
Otherwise, press Yes on any colour where the colour of the word matches the word itself.
|
|
The colour of the last word in the sequence is Blue:
If the colour of the word does not match the word itself three times or more in the sequence, press Yes on the first time in the sequence where the colour of the word does not match the word itself.
If the word Red is shown in Yellow colour, or the word Yellow is shown in White colour, press No when the word White is shown in Red colour.
Otherwise, press Yes the last time Green is either the word or the colour of the word in the sequence.
|
|
The colour of the last word in the sequence is Magenta:
If a colour occurs consecutively with different words, press Yes on the third entry in the sequence.
If the number of times the word Yellow appears is greater than the number of times that the colour of the word is Blue, press No the last time the word Yellow is in the sequence.
Otherwise, press No on the first time in the sequence where the colour of the word matches the word of the seventh entry in the sequence.
|
|
The colour of the last word in the sequence is White:
If the colour of the third word matches the word of the fourth word or fifth word, press No the first time that Blue is used as the word or the colour of the word in the sequence.
If the word Yellow is shown in Red colour, press Yes on the last time Blue is used as the colour of the word.
Otherwise, press No.
|
What do you get when you drop a piano down a mine shaft? A flat minor.
See Appendix A for indicator identification reference.
See Appendix B for battery identification reference.
See Appendix C for port identification reference.
See Appendix Piano for piano/keyboard reference.
| Required Symbol(s) | Further Requirements | Note Sequence |
| b | Last digit of serial number is even | Bb Bb Bb Bb Gb Ab Bb Ab Bb |
| c or # | 2 or more battery holders | Eb Eb D D Eb Eb D Eb Eb D D Eb |
| n and U | (No other requirements) | E F# F# F# F# E E E |
| C or T | RCA port is present | Bb A Bb F Eb Bb A Bb F Eb |
| B | SND indicator is present and lit | E E E C E G G |
| m or U or c | 3 or more batteries | C# D E F C# D E F Bb A |
| b and # | (No other requirements) | G G C G G C G C |
| C or m | Serial number contains a 3, 7 or 8 | A E F G F E D D F A |
| n or T or B | (No other requirements) | G G G Eb Bb G Eb Bb G |
| (No requirement) | (No other requirements) | B D A G A B D A |
This poorly programmed lookup device is as maddening with its slow responses as it is unforgiving with ill-timed inputs. Patience required.
Query a series of two-letter codes to track down the correct answer before submitting it. This primitive lookup machine is intolerant to incomplete and excessive inputs, as well as any input while it is busy.
If the serial number contains a letter, use the leftmost letter's numeric position in the alphabet as your base value (e.g. A=1, B=2). For no letters, use 0.
Add the last digit of the serial number multiplied by the number of batteries present.
If there is a Stereo RCA port present, double the current value.*
This value** is now the current code.
* Note: Skip this step if there is also an RJ45 port present.
** Note: Use the last two digits if the value is greater than 99. Prepend with a zero if less than 10.
Using the current code, look up the character pair. Enter that pair into the device and press "Query".
| -0 | -1 | -2 | -3 | -4 | -5 | -6 | -7 | -8 | -9 | |
|---|---|---|---|---|---|---|---|---|---|---|
| 0- | kb | dk | gv | tk | pv | kp | bv | vt | pz | dt |
| 1- | ee | zk | ke | ck | zp | pp | tp | tg | pd | pt |
| 2- | tz | eb | ec | cc | cz | zv | cv | gc | bt | gt |
| 3- | bz | pk | kz | kg | vd | ce | vb | kd | gg | dg |
| 4- | pb | vv | ge | kv | dz | pe | db | cd | td | cb |
| 5- | gb | tv | kk | bg | bp | vp | ep | tt | ed | zg |
| 6- | de | dd | ev | te | zd | bb | pc | bd | kc | zb |
| 7- | eg | bc | tc | ze | zc | gp | et | vc | tb | vz |
| 8- | ez | ek | dv | cg | ve | dp | bk | pg | gk | gz |
| 9- | kt | ct | zz | vg | gd | cp | be | zt | vk | dc |
The response code from the device from the query in Step 2 is now your current code. Perform Step 2 an additional 2 times, using the new code each time.
After receiving the response code from the final query, look up the corresponding character pair, enter the pair into the device and press "Submit".
Randomly punching in the letters will eventually give me another word. One of the arrangements must work, right?
The display shows a word. Rearrange the letters to form another word. It's got to work. It just has to. Note that the status light is on the top left of the module.These letters are confusing. I think they're in the wrong order.
The display shows a scrambled word. Decipher the word and punch it in to solve this module.This may look like the button you know and love, but don't be fooled! It's a brilliantly disguised imposter foiled only by a single mistake: It's the wrong shape.
Follow these rules in the order they are listed. Perform the first action that applies:I'm not sure this even qualifies as Simon Says...
| Priority | Top-Left Button Colour | |||
| Red | Yellow | Green | Blue | |
| Highest | Red | Blue | Green | Yellow |
| High | Blue | Yellow | Red | Green |
| Low | Green | Red | Yellow | Blue |
| Lowest | Yellow | Green | Blue | Red |
Stage 1
|
Stage 2
|
Stage 3
|
Stage 4
|
I think someone tried to make this module look really cool, but failed.
 |
 |
 |
 |
 |
 |
|||||
 |
 |
 |
 |
 |
 |
|||||
 |
 |
 |
 |
 |
 |
|||||
 |
 |
 |
 |
 |
 |
|||||
 |
 |
 |
 |
 |
 |
|||||
 |
 |
 |
 |
 |
 |
|||||
 |
 |
 |
 |
 |
 |
“Why did we send a deaf person to defuse a bomb?” — Person who is no longer alive.
Press the play button to play a sound clip through the speaker. Each sound clip has a corresponding code that contains any of the four symbols $ * & #. Match the sound clip to the table below and enter the code via the four button keypad.
| Taxi Dispatch | &&&** | Dial-up Internet | *#&*& |
| Cow | &$#$& | Police Radio Scanner | **### |
| Extractor Fan | $#$*& | Censorship Bleep | &&$&* |
| Train Station | #$$** | Medieval Weapons | &$**& |
| Arcade | $#$#* | Door Closing | #$#&$ |
| Casino | **$*# | Chainsaw | &#&&# |
| Supermarket | #$$&* | Compressed Air | $$*$* |
| Soccer Match | ##*$* | Servo Motor | $&#$$ |
| Tawny Owl | $#*$& | Waterfall | &**$$ |
| Sewing Machine | #&&*# | Tearing Fabric | $&&*& |
| Thrush Nightingale | **#** | Zipper | &$&## |
| Car Engine | &#**& | Vacuum Cleaner | #&$*& |
| Reloading Glock 19 | $&**# | Ballpoint Pen Writing | $*$** |
| Oboe | &#$$# | Rattling Iron Chain | *#$&& |
| Saxophone | $&&** | Book Page Turning | ###&$ |
| Tuba | #&$## | Table Tennis | *$$&$ |
| Marimba | &*$*$ | Squeaky Toy | $*&## |
| Phone Ringing | &$$&* | Helicopter | #&$&& |
| Tibetan Nuns | #&&&& | Firework Exploding | $&$$* |
| Throat Singing | **$$$ | Glass Shattering | *$*$* |
| Beach | *&*&& |
Note: pressing play also clears whatever code you have entered.
If bombs were stock brokers...
Defusing this module requires the expert to have a device that can connect to the World Wide Web.
This module has the ability to connect to the internet and query the state of foreign exchange rates. There should be a three times three grid of keys, each with a light emitting diode. DO NOT PRESS ANY KEY ON THIS MODULE WHILE THE LIGHT EMITTING DIODES ARE FLASHING IN SEQUENCE.
The keys are grouped by rows:
| Top row: ISO 4217 alphabetic code for the base currency.[1][2] |
| Middle row: ISO 4217 alphabetic code for the target currency.[1][2] |
| Bottom row: Value of currency to convert. |
Enter the following uniform resource locator into your internet capable device:
http://api.exchangeratesapi.io/latest?base=XXX&symbols=YYY
Replace XXX with the ISO 4217 alphabetic code for the base currency.
Replace YYY with the ISO 4217 alphabetic code for the target currency.
You will receive data in a Javascript object notation format, look for {"YYY": NUMBER}, where NUMBER will be the exchange rate. Using the exchange rate,
convert the number in the bottom row to the target currency, round that number
down and take note of the 2nd digit from the left[4]. Press the Nth key where N is
the noted number (count keys from left to right, top to bottom)[5].
In this case the module failed to query today's currency rates. Get the ISO 4217 numeric code for the target currency's country and take note the 2nd digit from the right. Press the Nth key where N is the noted number (count keys from left to right, top to bottom)[5].
[1]: If there is more than one battery on the bomb, the base currency code and target currency code is swapped.
[2]: This may instead be the ISO 4217 numeric code.
[3]: Note the currency rates are updated around 4PM CET.
[4]: In the case the converted currency is less than 10, the noted number is 0.
[5]: In the case the noted number is 0, press the top left key.
See Appendix ISO 4217 for currency codes reference.
Get it? Because it uses morse and maths! I'll see myself out...
Transmitted morse is interpreted based on gaps between button holds.
Holding for more than double the length of the average gap is considered to be a dash, and anything shorter is considered a dot.
When transmitting, E and T are considered equal, as they are indistinguishable.
Take the 4th and 5th character of the serial number, this is your character pair.
Perform each step below in sequence, modifying your character pair progressively:
After performing all steps, perform whatever rule applies below:
See Appendix Alphabet for alternative alphabet encoding reference.
This one likes attention, but not too much attention.
First number:
|
Second number:
|
All other numbers:
|
Logic is easy, but logic AND bomb defusal might not.
See Appendix A for indicator identification reference.
See Appendix B for battery identification reference.
See Appendix C for port identification reference.
| Letter | Statement | Letter | Statement |
|---|---|---|---|
| A | Number of batteries = number of indicators | N | More than 2 battery holders |
| B | Serial number has more letters than digits | O | Has both lit and unlit indicators |
| C | Has IND indicator | P | Has parallel port |
| D | Has FRK indicator | Q | Exactly 2 ports |
| E | Exactly 1 unlit indicator | R | Has PS/2 port |
| F | More than 1 port type | S | Sum of digits in serial number > 10 |
| G | 2 batteries or more | T | Has MSA indicator |
| H | Less than 2 batteries | U | Exactly 1 battery holder |
| I | Last digit of serial number is odd | V | Serial number contains vowels |
| J | More than 4 batteries | W | No indicators |
| K | Exactly 1 lit indicator | X | Exactly 1 indicator |
| L | More than 2 indicators | Y | More than 5 ports |
| M | No duplicate ports | Z | Less than 2 ports |
| Logical Connective | Symbol | Logic Gate Equivalent | Meaning |
|---|---|---|---|
| Conjunction | ∧ | AND | Returns true if all inputs are true. Else returns false. |
| Disjunction | ∨ | OR | Returns true if any input is true. Else returns false. |
| Exclusive Disjunction | ⊻ | XOR | Returns true if exactly one input is true. Else returns false. |
| Alternative Denial | | | NAND | Returns false if all inputs are true. Else returns true. |
| Joint Denial | ↓ | NOR | Returns false if any input is true. Else returns true. |
| Biconditional | ↔ | XNOR | Returns false if exactly one input is true. Else returns true. |
| Implication (Left) | → | - | Returns false when left input is true and right input is false. Else returns true. |
| Implication (Right) | ← | - | Returns false when left input is false and right input is true. Else returns true. |
This appears to be a strange interface for an old text adventure game. All of the inventory management puzzles you have come to know and love, but none of the story.
| Statistic | Description |
|---|---|
| 5 STR | Strength (STR) of player, used in combat |
| 5 DEX | Dexterity (DEX) of player, used in combat |
| 5 INT | Intelligence (INT) of player, used in combat |
| 5’ 5” | Height of player, in feet and inches |
| 15°C | Temperature, in degrees Celsius |
| 9.8 m/s² | Force of gravity, in meters per second squared |
| 101 kPa | Atmospheric pressure, in kilopascals |
| Item | Use if... |
|---|---|
| Balloon | Gravity is less than 9.3 m/s² or pressure is greater than 110 kPa, and not fighting an Eagle. |
| Battery | There is at most 1 battery on the bomb, and fighting an enemy other than a Golem or a Wizard. |
| Bellows | If fighting a Dragon or an Eagle, use if pressure is greater than 105 kPa. If fighting a different enemy, use if pressure is less than 95 kPa. |
| Cheat code | Cheaters never prosper! Don’t use these. |
| Crystal ball | INT is greater than the last digit of the serial number, and not fighting a Wizard. |
| Feather | DEX is greater than either STR or INT. |
| Hard drive | There are two or more of the same port on the bomb. |
| Lamp | Temperature is less than 12°C, and not fighting a Lizard. |
| Moonstone | There are at least two unlit indicators on the bomb. |
| Potion | Always use, but note that STR, DEX, and INT may change. |
| Small dog | Fighting an enemy other than a Demon, a Dragon, or a Troll. |
| Stepladder | The player is shorter than 4’, and fighting an enemy other than a Goblin or a Lizard. |
| Sunstone | There are at least two lit indicators on the bomb. |
| Symbol | Fighting a Demon or a Golem, or if the temperature is greater than 31°C. |
| Ticket | The player is 4’ 6” or taller, and gravity is at least 9.2 m/s², and at most 10.4 m/s². |
| Trophy | STR is greater than the first numeric digit of the serial number, or if fighting a Troll. |
| Enemy | STR | DEX | INT |
|---|---|---|---|
| Demon | 50 | 50 | 50 |
| Dragon | 10 | 11 | 13 |
| Eagle | 4 | 7 | 3 |
| Goblin | 3 | 6 | 5 |
| Golem | 9 | 4 | 7 |
| Troll | 8 | 5 | 4 |
| Lizard | 4 | 6 | 3 |
| Wizard | 4 | 3 | 8 |
| Weapon | Uses... | Bonus |
|---|---|---|
| Broadsword | STR | +0 |
| Caber | STR | +2 |
| Nasty Knife | DEX | +0 |
| Longbow | DEX | +2 |
| Magic orb | INT | +0 |
| Grimoire | INT | +2 |
How can something so simple be so infuriating?
Turn the key when the bomb's timer matches the time on the display, no sooner, no later.
I'd wash your hands after this one...
Red Input
| Yellow Input
|
Green Input
| Blue Input
|
Red Output
| Yellow Output
|
Green Output
| Blue Output
|
This safe either contains immense riches, or is empty.
| Dial | ||||||
| Top | Bottom | |||||
| Left | Middle | Right | Left | Middle | Right | |
| Serial | ||||||
| First | Second | Third | Fourth | Fifth | All | |
| A | 8 | 3 | 4 | 8 | 9 | 0 |
| B | 10 | 1 | 3 | 7 | 3 | 8 |
| C | 2 | 1 | 1 | 5 | 3 | 6 |
| D | 11 | 6 | 11 | 11 | 7 | 7 |
| E | 0 | 5 | 5 | 8 | 2 | 1 |
| F | 4 | 2 | 7 | 7 | 1 | 5 |
| G | 7 | 4 | 4 | 2 | 10 | 5 |
| H | 8 | 3 | 6 | 6 | 6 | 5 |
| I | 0 | 11 | 0 | 0 | 9 | 10 |
| J | 2 | 11 | 8 | 0 | 5 | 6 |
| K | 5 | 2 | 5 | 1 | 0 | 4 |
| L | 1 | 9 | 8 | 11 | 11 | 11 |
| M | 1 | 7 | 9 | 5 | 6 | 2 |
| N | 9 | 5 | 1 | 4 | 4 | 9 |
| O | 5 | 9 | 8 | 10 | 2 | 8 |
| P | 3 | 10 | 9 | 1 | 9 | 7 |
| Q | 4 | 10 | 6 | 1 | 4 | 8 |
| R | 8 | 0 | 4 | 0 | 6 | 11 |
| S | 9 | 4 | 0 | 6 | 3 | 10 |
| T | 7 | 6 | 7 | 11 | 5 | 3 |
| U | 11 | 9 | 6 | 3 | 11 | 1 |
| V | 11 | 11 | 2 | 8 | 1 | 0 |
| W | 6 | 0 | 11 | 6 | 11 | 2 |
| X | 4 | 2 | 7 | 2 | 8 | 10 |
| Y | 10 | 7 | 10 | 10 | 8 | 9 |
| Z | 3 | 7 | 1 | 10 | 0 | 4 |
| 0 | 7 | 0 | 3 | 5 | 8 | 6 |
| 1 | 9 | 10 | 10 | 9 | 1 | 2 |
| 2 | 2 | 5 | 11 | 7 | 7 | 3 |
| 3 | 10 | 8 | 10 | 4 | 10 | 4 |
| 4 | 6 | 8 | 0 | 3 | 5 | 0 |
| 5 | 6 | 3 | 3 | 3 | 0 | 11 |
| 6 | 1 | 1 | 5 | 2 | 7 | 3 |
| 7 | 0 | 6 | 2 | 4 | 2 | 1 |
| 8 | 5 | 4 | 9 | 9 | 10 | 7 |
| 9 | 3 | 8 | 2 | 9 | 4 | 9 |
WLMY ETGXFD EQCD ED PQKW WT CMFF EZYDFB.
SEE THE NEXT PAGE FOR AN EXCERPT OF "A CHRISTMAS CAROL".
SEE THE SUBSEQUENT PAGE FOR FREQUENT LETTERS AND WORDS.
This module will display ciphertext which contains a sentence from Charles Dickens' "A Christmas Carol" (aka the plaintext). The plaintext has been encrypted via a substituion cypher, meaning each letter in the alphabet is substituted for a different letter.
NOTE: The meaning of the word colors is currently unknown, however you can safely ignore them.
Excerpt from Charles Dickens' "A Christmas Carol".
Scrooge knew he was dead? Of course he did. How could it be otherwise? Scrooge and he were partners for I don't know how many years. Scrooge was his sole executor, his sole administrator, his sole assign, his sole residuary legatee, his sole friend, and sole mourner. And even Scrooge was not so dreadfully cut up by the sad event, but that he was an excellent man of business on the very day of the funeral, and solemnised it with an undoubted bargain. The mention of Marley's funeral brings me back to the point I started from. There is no doubt that Marley was dead. This must be distinctly understood, or nothing wonderful can come of the story I am going to relate. If we were not perfectly convinced that Hamlet's Father died before the play began, there would be nothing more remarkable in his taking a stroll at night, in an easterly wind, upon his own ramparts, than there would be in any other middle-aged gentleman rashly turning out after dark in a breezy spot -- say Saint Paul's Churchyard for instance -- literally to astonish his son's weak mind.
Scrooge never painted out Old Marley's name. There it stood, years afterwards, above the warehouse door: Scrooge and Marley. The firm was known as Scrooge and Marley. Sometimes people new to the business called Scrooge Scrooge, and sometimes Marley, but he answered to both names. It was all the same to him.
Oh! But he was a tight-fisted hand at the grind-stone, Scrooge! A squeezing, wrenching, grasping, scraping, clutching, covetous, old sinner! Hard and sharp as flint, from which no steel had ever struck out generous fire; secret, and self-contained, and solitary as an oyster. The cold within him froze his old features, nipped his pointed nose, shrivelled his cheek, stiffened his gait; made his eyes red, his thin lips blue and spoke out shrewdly in his grating voice. A frosty rime was on his head, and on his eyebrows, and his wiry chin. He carried his own low temperature always about with him; he iced his office in the dogdays; and didn't thaw it one degree at Christmas.
External heat and cold had little influence on Scrooge. No warmth could warm, no wintry weather chill him. No wind that blew was bitterer than he, no falling snow was more intent upon its purpose, no pelting rain less open to entreaty. Foul weather didn't know where to have him. The heaviest rain, and snow, and hail, and sleet, could boast of the advantage over him in only one respect. They often 'came down' handsomely, and Scrooge never did. Nobody ever stopped him in the street to say, with gladsome looks, `My dear Scrooge, how are you? When will you come to see me?' No beggars implored him to bestow a trifle, no children asked him what it was o'clock, no man or woman ever once in all his life inquired the way to such and such a place, of Scrooge. Even the blind men's dogs appeared to know him; and when they saw him coming on, would tug their owners into doorways and up courts; and then would wag their tails as though they said, `No eye at all is better than an evil eye, dark master!'
But what did Scrooge care! It was the very thing he liked. To edge his way along the crowded paths of life, warning all human sympathy to keep its distance, was what the knowing ones call `nuts' to Scrooge.
Word and Letter Frequency in Charles Dickens' "A Christmas Carol".

| Frequent 2 letter words | Frequent 3 letter words |
|---|---|
|
|
| Frequent 4 letter words | Frequent 5 letter words |
|
|
| Frequent 6 letter words | Frequent 7 letter words |
|
|
| Frequent 8 letter words | Frequent 9 letter words |
|
|
Under pressure, chess can feel more like a game of battleships.
This module is based on a 6×6 chessboard (referenced on the following page) and all figures follow the standard FIDE movement rules.
The chess module will present with a display and two rows of six buttons each.
Use this table as reference to determine the correct figure for each position:
Position #1: Monarchy vs TheocracyOccupied by a king if Position #5 is occupied by a queen. Otherwise, the field is occupied by a bishop. |
Position #2: Commander of the ArmyOccupied by a rook if the last digit of the serial number is odd. Otherwise, the field is occupied by a knight. |
Position #3: A Matter of RegentsOccupied by a queen if there are less than two rooks on the board. Otherwise, the field is occupied by a king. |
Position #4: The Iron TowerAlways occupied by a rook. |
Position #5: Conflict between Good and EvilOccupied by a queen if the field is white. Otherwise, the field is occupied by a rook. |
Position #6: The Scepter, the Sword and the CrosierOccupied by a queen if there are no other queens on the board. Otherwise, occupied by a knight if there are no other knights on the board. Otherwise, the field is occupied by a bishop. |
Use the following graphic as a reference for the chess board layout.

Order is everything.
This module has two keys and a display. The display indicates this module’s priority.
LEFT KEY
Turn the left key after you have done all of the following:
But before you have done any of the following:
RIGHT KEY
Turn the right key after you have done all of the following:
But before you have done any of the following:
You are in a maze of twisty passages, all alike. Exits are to the north, south, east, and west.
Row:
Column:
Direction:
Sassy Sally said sorry since soggy Steven slurped soup.
Only press the KEEP button when the slots are in a LEGAL state. Only pull the lever when the slots are in an ILLEGAL state. The module will automatically defuse after 4 pulls of the lever.
The slots are in an ILLEGAL state if any of these statements are true:
UNDERLINED words are placeholders, substitute them for the correct word using the matrix below and the keyword found on the module’s display. This keyword changes when the lever is pulled.
| Placeholder | ||||||||
|---|---|---|---|---|---|---|---|---|
| Sassy | Silly | Soggy | Sally | Simon | Sausage | Steven | ||
| Key Word | Sassy | Blue | Red | Green | Cherry | Grape | Bomb | Coin |
| Silly | Blue | Green | Red | Coin | Bomb | Grape | Cherry | |
| Soggy | Green | Blue | Red | Coin | Cherry | Bomb | Grape | |
| Sally | Red | Blue | Green | Grape | Cherry | Bomb | Coin | |
| Simon | Red | Green | Blue | Bomb | Grape | Cherry | Coin | |
| Sausage | Red | Blue | Green | Grape | Bomb | Coin | Cherry | |
| Steven | Green | Red | Blue | Cherry | Bomb | Coin | Grape | |
This has to be illegal somehow...
See Appendix A for indicator identification reference.|
All Slots
Replace any 2 with a 5 and any 7 with a 0. For every lit indicator add 1 to the number and subtract 1 for every unlit indicator. If the number is a multiple of 3, add 4 to it. Otherwise, if the number is greater than 7, multiply it by 2. Otherwise, if the number is less than 3 and it's an even number, divide it by 2. Otherwise, if there is an RCA or a PS/2 port on the bomb, skip the rest of the rules in this section. Otherwise, take the original digit and add the number of batteries on the bomb. |
|
1st Slot
If the number is even and greater than 5, divide it by two. Otherwise, if the number is prime, add the rightmost number in the serial number. Otherwise, if there is a parallel port on the bomb, multiply it by -1. Otherwise, if the original digit to the right is odd, leave this number unchanged. Otherwise, subtract 2 from it. |
|
2nd Slot
If there is a unlit BOB indicator, leave this number unchanged. Otherwise, if the number is 0, add the original digit from the 1st display. Otherwise, if the number is in the Fibonacci sequence, add the next number from the Fibonacci sequence based on the first occurrence of the number. Otherwise, if the number is greater than or equal to 7, add 4. Otherwise, multiply it by 3. |
|
3rd Slot
If there is a serial port on the bomb, add the largest number from the serial number. Otherwise, if the original digit is the same as any of the other original digits, leave this number unchanged. Otherwise, if the number is greater than or equal to 5, add up all the individual digits in the binary form of the original digit for the new number. Otherwise, add 1 to the number. |
Communication was dangerous back in the days. Can you figure out what the original message was?
Decipher the characters on the display with the help of Caesar’s tactics. There’s no delete button, so press those buttons carefully!
For example: if the offset is -2, D becomes B and L becomes J. The table below can be used to calculate the required offset. If the offset column contains an = sign, that value should be used, regardless of other rules that apply.
| Condition | Offset |
|---|---|
| Serial number contains a vowel | -1 |
| Number of batteries | +1 per battery |
| The last digit of the serial number is even | +1 |
| Indicator with label CAR is present | +1 |
| Parallel port and lit indicator with label NSA is present | =0 |
This module is powered by the restless soul of a murder victim. The only way to disarm it is to solve the case so the victim can pass peacefully to the afterlife.
See Appendix A for indicator identification reference.| Miss Scarlett | Professor Plum | Mrs Peacock | Reverend Green | Colonel Mustard | Mrs White | |
|---|---|---|---|---|---|---|
| Candle- stick | Dagger | Lead Pipe | Revolver | Rope | Spanner | |
| 1 | Dining Room | Library | Lounge | Kitchen | Study | Conserv- atory |
| 2 | Study | Hall | Billiard Room | Lounge | Kitchen | Library |
| 3 | Kitchen | Billiard Room | Ballroom | Library | Conserv- atory | Dining Room |
| 4 | Lounge | Ballroom | Dining Room | Conserv- atory | Hall | Kitchen |
| 5 | Billiard Room | Kitchen | Study | Ballroom | Dining Room | Hall |
| 6 | Conserv- atory | Lounge | Library | Study | Billiard Room | Ballroom |
| 7 | Ballroom | Conserv- atory | Kitchen | Hall | Library | Study |
| 8 | Hall | Study | Conserv- atory | Dining Room | Lounge | Billiard Room |
| 9 | Library | Dining Room | Hall | Billiard Room | Ballroom | Lounge |
Child’s play. Just follow the leader. Only if you fail to follow, the penalty is somewhat more explosive.
This module contains 8-12 wires connecting numerically labeled plugs in a looping sequence. Each wire leads from one plug to the next plug that contains a wire in ascending numerical order. A wire leading from plug 1 is considered to be “wire 1”.
Progress through the module by first determining the starting wire, then checking whether to cut each wire in the sequence. Each wire will need to be either cut or left uncut based on the state of the previous wire(s) in the sequence.
Follow the first rule below that applies:
| Step | Cut this wire if: |
|---|---|
| A or N | The previous wire is not yellow or blue or green. |
| B or O | The previous wire leads to an even numbered plug. |
| C or P | The previous wire should be cut. |
| D or Q | The previous wire is red or blue or black. |
| E or R | Two of the previous three wires share a color. |
| F or S | Exactly one of the previous two wires is the same color as this wire. |
| G or T | The previous wire is yellow or white or green. |
| H or U | The previous wire should not be cut. |
| I or V | The previous wire skips a plug. |
| J or W | The previous wire is not white or black or red. |
| K or X | The previous two wires are different colors. |
| L or Y | The previous wire does not lead to a position labeled 6 or less. |
| M or Z | Exactly one or neither of the previous two wires are white or black. |
What? Where?
The module appears blank, but has eight touch-sensitive regions laid out as in the following diagram. Touch the regions that have the most conditions met in any order.
|
|
|
|
|
|
|
|
|
Dammit Jim, I’m a doctor, not a honeybee!
Find the submaze of side length 4 with matching markings. The submaze on the bomb (and its markings) may be a rotation of the maze as it is shown above.
Refer to the color chart in the top left and navigate the pawn out of the submaze through an exit on the side indicated by the pawn’s color.
Warning: Do not cross the lines shown in the maze. These lines are invisible on the bomb.
Over 18 quintillion combinations, only some of them actually matter.
| # | Rule |
|---|---|
| 0 | If exactly one quadrant has 5 or fewer white pixels, the answer is the number of white pixels in the other 3 quadrants. |
| 1 | If there are exactly as many mostly-white quadrants as there are lit indicators, the answer is the number of batteries. |
| 2 | If exactly one row or column is completely white or completely black, the answer is its x-/y-coordinate (starting from 1 in the top/left). |
| 3 | If there are fewer mostly-white quadrants than mostly-black quadrants, the answer is the number of mostly-black quadrants. |
| 4 | If the entire bitmap has 36 or more white pixels, the answer is the total number of white pixels. |
| 5 | If there are more mostly-white quadrants than mostly-black quadrants, the answer is the smallest number of black pixels in any quadrant. |
| 6 | If exactly one quadrant has 5 or fewer black pixels, the answer is the number of black pixels in the other 3 quadrants. |
| 7 | If there are exactly as many mostly-black quadrants as there are unlit indicators, the answer is the number of ports. |
| 8 | If there is a 3×3 square that is completely white or completely black, the answer is the x-coordinate (starting from 1) of the center of the first such square in reading order. |
| 9 | If there are exactly as many mostly-white quadrants as mostly-black quadrants, the answer is the first numeric digit of the serial number. |
This module is identical to Who's On First, except with four characters on each button instead of confusing words and phrases. This should be easy... right?
Based on the display, read the label of a particular button and proceed to step 2:
|
|
|
|
|
| ||||||||||||||||||||||||||||||||||||||||||||||||
|
|
|
|
|
| ||||||||||||||||||||||||||||||||||||||||||||||||
|
|
|
|
|
| ||||||||||||||||||||||||||||||||||||||||||||||||
|
|
|
|
|
| ||||||||||||||||||||||||||||||||||||||||||||||||
|
|
|
|
||||||||||||||||||||||||||||||||||||||||||||||||||
Using the label from step 1, push the first button that appears in its corresponding list:
| "XI8Z": | NHXS, I8O9, XOHZ, 6O8I, 6NZH, 66I8, H6SI, Z8IX, XI8Z, SXHN, H68S, 8OXN, IH6X, NXO8 |
|---|---|
| "H68S": | 6NZH, I8O9, NHXS, 6O8I, SXHN, H6SI, IH6X, 8OXN, NXO8, XI8Z, Z8IX, XOHZ, 66I8, H68S |
| "SXHN": | Z8IX, 8OXN, NXO8, H68S, XOHZ, XI8Z, H6SI, NHXS, IH6X, 6NZH, 66I8, I8O9, SXHN, 6O8I |
| "Z8IX": | NXO8, H6SI, I8O9, 6O8I, Z8IX, 66I8, XI8Z, IH6X, SXHN, XOHZ, 6NZH, 8OXN, NHXS, H68S |
| "IH6X": | 8OXN, H6SI, I8O9, 6O8I, NHXS, Z8IX, SXHN, 66I8, 6NZH, XOHZ, NXO8, H68S, IH6X, XI8Z |
| "NHXS": | I8O9, H6SI, 8OXN, 6O8I, H68S, XOHZ, 66I8, XI8Z, IH6X, NHXS, 6NZH, Z8IX, SXHN, NXO8 |
| "XOHZ": | 8OXN, XOHZ, 6NZH, IH6X, XI8Z, Z8IX, 6O8I, SXHN, I8O9, H68S, NXO8, NHXS, 66I8, H6SI |
| "8OXN": | XI8Z, IH6X, 6NZH, XOHZ, I8O9, NHXS, H6SI, SXHN, 66I8, Z8IX, 8OXN, 6O8I, NXO8, H68S |
| "6NZH": | H6SI, 6NZH, H68S, SXHN, 6O8I, NHXS, Z8IX, XOHZ, 8OXN, NXO8, 66I8, XI8Z, I8O9, IH6X |
| "H6SI": | NHXS, IH6X, XI8Z, 66I8, SXHN, NXO8, XOHZ, H6SI, 6O8I, 6NZH, 8OXN, Z8IX, I8O9, H68S |
| "6O8I": | Z8IX, XI8Z, I8O9, XOHZ, IH6X, 66I8, SXHN, NXO8, 6NZH, 6O8I, H6SI, H68S, 8OXN, NHXS |
| "I8O9": | 6O8I, SXHN, H68S, NHXS, 8OXN, IH6X, NXO8, I8O9, 6NZH, XI8Z, Z8IX, 66I8, XOHZ, H6SI |
| "NXO8": | 8OXN, SXHN, Z8IX, I8O9, NHXS, 6NZH, H68S, 66I8, XOHZ, NXO8, IH6X, XI8Z, H6SI, 6O8I |
| "66I8": | H6SI, 6O8I, NHXS, XI8Z, 66I8, I8O9, IH6X, 8OXN, Z8IX, 6NZH, H68S, XOHZ, SXHN, NXO8 |
| "9NZS": | 8NSZ, 8I99, ZHOX, HZN9, IS9H, SNZX, SZN6, XZNS, SI9X, 9NZS, ZSN8, X6IS, X9HI, S89H |
| "8I99": | ZHOX, IS9H, X6IS, SNZX, SI9X, X9HI, ZSN8, XZNS, 9NZS, S89H, HZN9, 8NSZ, SZN6, 8I99 |
| "ZHOX": | ZSN8, 8I99, SNZX, ZHOX, IS9H, SZN6, 8NSZ, S89H, HZN9, 9NZS, SI9X, XZNS, X6IS, X9HI |
| "HZN9": | 9NZS, HZN9, SZN6, IS9H, ZSN8, 8I99, S89H, ZHOX, SI9X, SNZX, 8NSZ, X9HI, X6IS, XZNS |
| "SZN6": | X9HI, S89H, SZN6, SNZX, SI9X, 8NSZ, ZHOX, XZNS, HZN9, X6IS, IS9H, ZSN8, 8I99, 9NZS |
| "S89H": | SNZX, 8NSZ, IS9H, SI9X, HZN9, SZN6, ZSN8, X9HI, S89H, 9NZS, X6IS, XZNS, 8I99, ZHOX |
| "SNZX": | SNZX, ZHOX, 8I99, 9NZS, X9HI, XZNS, ZSN8, IS9H, 8NSZ, X6IS, HZN9, SZN6, S89H, SI9X |
| "ZSN8": | SZN6, S89H, 8I99, HZN9, IS9H, ZSN8, X9HI, 9NZS, SNZX, X6IS, ZHOX, 8NSZ, XZNS, SI9X |
| "SI9X": | 9NZS, XZNS, HZN9, ZHOX, S89H, X9HI, ZSN8, X6IS, 8I99, SNZX, SZN6, IS9H, SI9X, 8NSZ |
| "X9HI": | 8NSZ, SNZX, IS9H, SI9X, ZHOX, SZN6, HZN9, XZNS, X6IS, 9NZS, S89H, 8I99, ZSN8, X9HI |
| "IS9H": | SI9X, SNZX, ZSN8, ZHOX, XZNS, 8NSZ, IS9H, X6IS, X9HI, 8I99, SZN6, HZN9, S89H, 9NZS |
| "XZNS": | 8I99, S89H, X9HI, ZSN8, 9NZS, SZN6, 8NSZ, SI9X, HZN9, IS9H, XZNS, SNZX, ZHOX, X6IS |
| "8NSZ": | 8I99, X9HI, X6IS, HZN9, 9NZS, XZNS, SNZX, SZN6, 8NSZ, S89H, SI9X, IS9H, ZHOX, ZSN8 |
| "X6IS": | HZN9, IS9H, S89H, SZN6, XZNS, X9HI, ZSN8, SI9X, SNZX, 9NZS, X6IS, 8NSZ, 8I99, ZHOX |
Something to remember your explosion by.
The module asks questions about the state of other modules that you solved prior. Answer all the questions correctly.
See Appendix Souvenir for required information reference.
LZIEAJDHARDERBNCOJWTHANPQIEYBZITLOOKSYWH
A field of 36 letters will appear on the screen within the module. Some of these letters will spell out words, which may be spelled backwards and appear in any direction.
How did they get invisible ink to even work like that?
Sorting and folding are the least of your worries.
All the messes from the previous explosions must be cleaned up. Using the Laundry Symbol Reference L4UHDR9 and the rules below, determine the correct setting on the machine panel. Once satisfied, insert a coin. On error, a sock will be lost, and a strike gained.
Determine the piece of clothing that has to be cleaned with the tables below. For all values higher than 5, subtract 6 from the total until the new number is less than 6. For all negative values, add 6 until you have a value between 0–5.
Use washing instructions based on the material, drying instructions based on the color, and use ironing and special instructions based on the item. But, prioritize the following rules from top to bottom:
Input the solution through putting The Washing Symbol top-left, The Drying top-right, Ironing on the top display and Special on the bottom display.
| CLOTHING ITEM | WASHING | DRYING | IRONING | SPECIAL | |
|---|---|---|---|---|---|
| 0 | Corset | 140°F | Dry Flat | 2 dots | |
| 1 | Shirt | 105°F | No steam | No Tetrachlorethylene | |
| 2 | Skirt | 30°C | Hang To Dry | Reduced Moisture | |
| 3 | Skort | Tumble Dry | 3 Dots | Circle Top Left | |
| 4 | Shorts | Do Not Wring | Shade | 150°C | |
| 5 | Scarf | 95°C | Dry | Do not Dry Clean |
| CLOTHING MATERIAL | WASHING | DRYING | IRONING | SPECIAL | |
|---|---|---|---|---|---|
| 0 | Polyester | 50°C | No Heat | 2 dots | |
| 1 | Cotton | Medium Heat | Iron | Do Not Dry Clean | |
| 2 | Wool | Handwash | 390°F | Reduced Moisture | |
| 3 | Nylon | 30°C | Drip Dry | Low Heat | |
| 4 | Corduroy | 105°F | 110°C | W | |
| 5 | Leather | Do Not Wash | Do Not Dry | Do Not Iron |
| CLOTHING COLOR | WASHING | DRYING | IRONING | SPECIAL | |
|---|---|---|---|---|---|
| 0 | Ruby Fountain | 140°F | Do Not Iron | ||
| 1 | Star Lemon Quartz | Dry Flat | Iron | ||
| 2 | Sapphire Springs | 80°F | Tumble Dry | ||
| 3 | Jade Cluster | 30°C | 300°F | ||
| 4 | Clouded Pearl | Low Heat | No steam | ||
| 5 | Malinite | 60°C | Medium Heat |
 machine wash permanent press |
 machine wash gentle or delicate |
 hand wash |
 do not wash |
 30°C or 80°F |
 40°C or 105°F |
 50°C or 120°F |
 60°C or 140°F |
 70°C or 160°F |
 95°C or 200°F |
 30°C or 80°F |
 40°C or 105°F |
 50°C or 120°F |
 60°C or 140°F |
 70°C or 160°F |
 95°C or 200°F |
 do not wring |
 tumble dry |
 low heat |
 medium heat |
 high heat |
 no heat |
 hang to dry |
 drip dry |
 dry flat |
 dry in the shade |
 do not dry |
 do not tumble dry |
 dry |
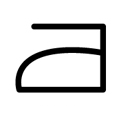 iron |
 do not iron |
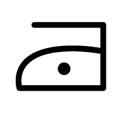 110°C 230°F |
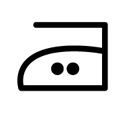 150°C 300°F |
 200°C 390°F |
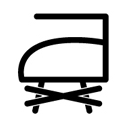 no steam |
 bleach |
 do not bleach |
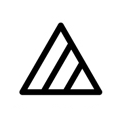 non-chlorine bleach |
 dryclean |
 any solvent |
 any solvent except tetrachlorethylene |
 petroleum solvent only |
 wet cleaning |
 do not dryclean |
 short cycle |
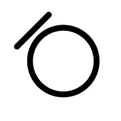 reduced moisture |
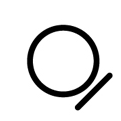 low heat |
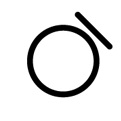 no steam finishing |
FIRE! ... (splash) Missed.
Attention, Cadet. We’ve narrowed the enemy’s locations to within this 5×5 grid. The targets in this area are concealed, but we do have a fair bit of intelligence on them.
We suspect this information may not be enough to determine with accuracy where the enemy forces are deployed. This is where you come in. We need you to figure out which locations within the battle arena we can safely survey without being seen:
Attention, Ensign. We need you to ascertain the locations of all enemy vessels. When you have done so, the module is disarmed. The following tools are at your disposal:
Our intelligence indicates that:
Good luck. Make us proud.
A module, please. Shaken, not stirred. Stupid piece of junk; broken display, broken buttons...
NOTE: This module is old, and the last digit glitches out when the first digit is zero. In addition, the wiring for the buttons is acting up, so the functions of the buttons may be swapped. Fortunately, the strikes from the submit button are only registered by the bomb if the displayed number is less than 10.
| 60 | 02 | 15 | 57 | 36 | 83 | 48 | 71 | 24 |
| 88 | 46 | 31 | 70 | 22 | 64 | 07 | 55 | 13 |
| 74 | 27 | 53 | 05 | 41 | 18 | 86 | 30 | 62 |
| 52 | 10 | 04 | 43 | 85 | 37 | 61 | 28 | 76 |
| 33 | 65 | 78 | 21 | 00 | 56 | 12 | 44 | 87 |
| 47 | 81 | 26 | 68 | 14 | 72 | 50 | 03 | 35 |
| 06 | 38 | 42 | 84 | 63 | 20 | 75 | 17 | 51 |
| 25 | 73 | 67 | 16 | 58 | 01 | 34 | 82 | 40 |
| 11 | 54 | 80 | 32 | 77 | 45 | 23 | 66 | 08 |
The rules are simple: neutralize or be neutralized.
The acid type can be determined using the following chart:
| Solution Color | Acid Type |
|---|---|
| Red | Hydrogen bromide |
| Yellow | Hydrogen fluoride |
| Green | Hydrogen chloride |
| Blue | Hydrogen iodide |
The base that must be used to titrate can be determined via the following ruleset:
The concentration of the acid can be determined via the following process:
The concentration of the base can be determined via the following ruleset:
| NH3 | KOH | LiOH | NaOH | |
|---|---|---|---|---|
| HBr | S | NS | NS | S |
| HF | NS | S | NS | S |
| HCl | NS | NS | S | NS |
| HI | S | S | S | NS |
| Name | Chemical Formula | Cation | Chemical Symbol | Atomic Number |
|---|---|---|---|---|
| Ammonia | NH3 | Hydrogen | H | 1 |
| Lithium hydroxide | LiOH | Lithium | Li | 3 |
| Sodium hydroxide | NaOH | Sodium | Na | 11 |
| Potassium hydroxide | KOH | Potassium | K | 19 |
| Name | Chemical Formula | Anion | Chemical Symbol | Atomic Number |
|---|---|---|---|---|
| Hydrofluoric acid | HF | Fluorine | F | 9 |
| Hydrochloric acid | HCl | Chlorine | Cl | 17 |
| Hydrobromic acid | HBr | Bromine | Br | 35 |
| Hydroiodic acid | HI | Iodine | I | 53 |
Ooooh, shiny lights and buttons. Touchy touchy!
| Red | Green | Blue | Yellow | Purple | Orange |
| 2 | 3 | 4 | 5 | 6 | 7 |
When has bomb defusal ever been a game of chance?
There are five dice in the colors of purple, yellow, blue, white and black. Start by rolling the dice. Then choose which dice to keep and which to reroll. You may only keep dice of the same value. Keep repeating this process until you get a Yahtzee.*
At each stage, the dice to keep are given by the following rules:
Follow the first rule that applies:
| If there is a... | Die color |
|---|---|
| parallel port | purple |
| PS/2 port | blue |
| RCA port | white |
| RJ port | black |
| otherwise | yellow |
Yahtzee: All dice show the same value.
Large straight: Five consecutive values.
Small straight: Four consecutive values. The outlier is the fifth die.
Three of a kind: Three dice of equal value, but not four.
Full house: Three of a kind plus two of another kind.
These terms always refer to all of the dice, regardless of which were rolled and which were kept.
Keep rolling it until you achieve a Yahtzee.
Needy modules cannot be disarmed, but pose a recurrent hazard.
Needy modules can be identified as a module with a small 2‑digit timer in the top center. Interacting with the bomb may cause them to become activated. Once activated, these needy modules must be tended to regularly before their timer expires in order to prevent a strike.
Stay observant: needy modules may reactivate at any time.
Computer hacking is hard work! Well, it usually is. This job could probably be performed by a simple drinking bird pressing the same key over and over again.
I'm going to guess that this is just meant to occupy your attention, because otherwise this is some shoddy electronics work.
Needlessly complicated and endlessly needy. Imagine if such expertise were used to make something other than diabolical puzzles.
| X | X | X | |||
| X | X | X | X | X |
| X | X | X | |||
| X | X | X | X |
| X | X | X | |||
| X | X | X | X | X |
| X | X | X | |||
| X | X |
| X | |||||
| X | X | X | X |
| X | |||||
| X | X |
| X | X | X | X | X | |
| X | X | X | X |
| X | X | X | |||
| X | X | X | X |
X = Lit LED
What's this game called? Ok, let's do that.
This module requires a microphone connected to the device used by the defuser to disarm bombs.
If the module does not work correctly, it has likely been misconfigured.
See Appendix BombMfg#AF for configuration notes.
I hope you studied, it's quiz night!
Hello, this is emergency services, please hold...
Labelled indicator lights can be found on the sides of the bomb casing.
Common battery types can be found within enclosures on the sides of the bomb casing.
| Battery | Type |
|---|---|
| AA | |
| D |
Digital and analog ports can be found on sides of the bomb casing.
| Port | Name |
|---|---|
| DVI-D | |
| Parallel | |
| PS/2 | |
| RJ-45 | |
| Serial | |
| Stereo RCA |
Use the following graphic as a reference to how tones are mapped onto a standard 12-note piano/keyboard.
These are the instructions about Filibuster given to the bomb makers, who configure the module before the bomb is armed. This information can not be used to disarm the bomb.
This module requires a microphone. It will look for the default recording device and listen to it to determine the volume.
The thresholds can be configured with a text editor using the filibuster‑settings.txt file, located in the modsettings folder. Restarting the software may be required when changing these values.
This is the default for the file:
{"MicThreshold": 25.0, "FailureThreshold": 3}
MicThreshold - a value from 0.0 - 100.0 to adjust for the microphone. FailureThreshold - an integer value for the number of seconds of failing the mic check before a strike. A range of 1 - 10 is recommended.
The following is a list of active codes of official ISO 4217 currency names that are supported by http://api.exchangeratesapi.io/. In the standard the values are called "alphabetic code" and "numeric code".
| Code | Num. | Currency | Code | Num. | Currency | Code | Num. | Currency | ||
|---|---|---|---|---|---|---|---|---|---|---|
| AUD | 036 | Australian dollar | HRK | 191 | Croatian kuna | NZD | 554 | New Zealand dollar | ||
| BGN | 975 | Bulgarian lev | HUF | 348 | Hungarian forint | PHP | 608 | Philippine peso | ||
| BRL | 986 | Brazilian real | IDR | 360 | Indonesian rupiah | PLN | 985 | Polish złoty | ||
| CAD | 124 | Canadian dollar | ILS | 376 | Israeli new shekel | RON | 946 | Romanian leu | ||
| CHF | 756 | Swiss franc | INR | 356 | Indian rupee | RUB | 643 | Russian ruble | ||
| CNY | 156 | Renminbi | ISK | 352 | Icelandic króna | SEK | 752 | Swedish krona | ||
| CZK | 203 | Czech koruna | JPY | 392 | Japanese yen | SGD | 702 | Singapore dollar | ||
| DKK | 208 | Danish krone | KRW | 410 | South Korean won | THB | 764 | Thai baht | ||
| EUR | 978 | Euro | MXN | 484 | Mexican peso | TRY | 949 | Turkish lira | ||
| GBP | 826 | Pound sterling | MYR | 458 | Malaysian ringgit | USD | 840 | United States dollar | ||
| HKD | 344 | Hong Kong dollar | NOK | 578 | Norwegian krone | ZAR | 710 | South African rand |
| A | 1 | N | 14 | |
| B | 2 | O | 15 | |
| C | 3 | P | 16 | |
| D | 4 | Q | 17 | |
| E | 5 | R | 18 | |
| F | 6 | S | 19 | |
| G | 7 | T | 20 | |
| H | 8 | U | 21 | |
| I | 9 | V | 22 | |
| J | 10 | W | 23 | |
| K | 11 | X | 24 | |
| L | 12 | Y | 25 | |
| M | 13 | Z | 26 |
| 0 | 1 | 2 | 3 | 4 | 5 | 6 | 7 | 8 | 9 |
| 10 | 11 | 12 | 13 | 14 | 15 | 16 | 17 | 18 | 19 |
| 20 | 21 | 22 | 23 | 24 | 25 | 26 | 27 | 28 | 29 |
Negative numbers are never prime.
| Decimal | Binary Form |
| 0 | 0000 |
| 1 | 0001 |
| 2 | 0010 |
| 3 | 0011 |
| 4 | 0100 |
| 5 | 0101 |
| 6 | 0110 |
| 7 | 0111 |
| 8 | 1000 |
| 9 | 1001 |
| 10 | 1010 |
| Module | Information required |
|---|---|
| 3D Maze | What were the markings? What was the cardinal direction? |
| Adventure Game | Which correct items did you use? Which enemy were you fighting? |
| Bitmaps | How many pixels were black/white in each quadrant? |
| Broken Buttons | What were the correct buttons you pressed? |
| The Button* | What color did the light glow? |
| Chess | What were the coordinates? |
| Double-Oh | Which button was the submit button? |
| Hexamaze | What was the color of the pawn? |
| LED Encryption | What were the correct button presses? |
| Listening | What was the correct code you entered? |
| Maze* | What was the starting position? |
| Memory* | What was the display in each stage? What were the positions and labels of the buttons you pressed? |
| Morsematics | What were the received letters? |
| Murder | Which were the suspects and weapons? Where was the body found? |
continued on next page...
| Module | Information required |
|---|---|
| Neutralization | What was the acid’s color/volume? |
| Silly Slots | What were the slots in each stage? |
| Simon Says* | Which colors flashed in the final sequence? |
| Simon States | Which color(s) flashed in each stage? |
| Skewed Slots | What were the original numbers? |
| Souvenir* | What was the first module the other Souvenir asked a question about? |
| Third Base | What was the display word in the first/second stage? |
| Two Bits | What were the correct three query responses? |
| Who's on First* | What was the display word in the first/second stage? |
| Wire Sequence* | How many wires of each color were there? |
| Yahtzee | What was the first roll? |
* Souvenir modules may have been configured to ignore these modules.